The GoTrading SDK offers robust support for efficient Bulk Listing across multiple marketplaces. This feature enables you to conveniently list multiple NFTs you own across various marketplaces in simplified operations, significantly streamlining the listing process. By automating and consolidating this process, the SDK saves you valuable time and reduces the complexity usually associated with managing listings on multiple platforms.
For Dapp Developers
List Multiple NFTs
For Dapp developers, the most straightforward approach to incorporate the NFT Bulk Listing feature into your product is detailed below. Please note, the Bulk Listing feature necessitates several stages of interaction between the user and your client-end.
1. Initialize the GoTrading Instance with configuration as you boot up your server-end
// Server-end code

// Init sdk client
import Web3 from 'web3';
import { initListingIndexer, NFTInfoForListing } from '@nftgo/gotrading';

const openseaApi = {
    apiKey: 'apiKey', // Replace with your own opensea api key
    requestsPerInterval: 2,
    interval: 1000,
};

const x2y2Api = {
    apiKey: 'apiKey', // Replace with your own x2y2 api key
    requestsPerInterval: 2,
    interval: 1000,
};

const config = {
  apiKey: "YOUR-API-KEY", // Replace with your own API Key.
  openSeaApiKeyConfig: openseaApi,
  x2y2ApiKeyConfig: x2y2Api,
};

// Create ListingIndexer client
const { listingIndexer } = initListingIndexer(config);
The ListingIndexer will utilize the NFTGo API Key configured here to invoke NFTGo Developer APIs, and it will use the other marketplaces' API Keys to interact with their corresponding APIs.
2. User views the NFTs he/she owns on your Dapp
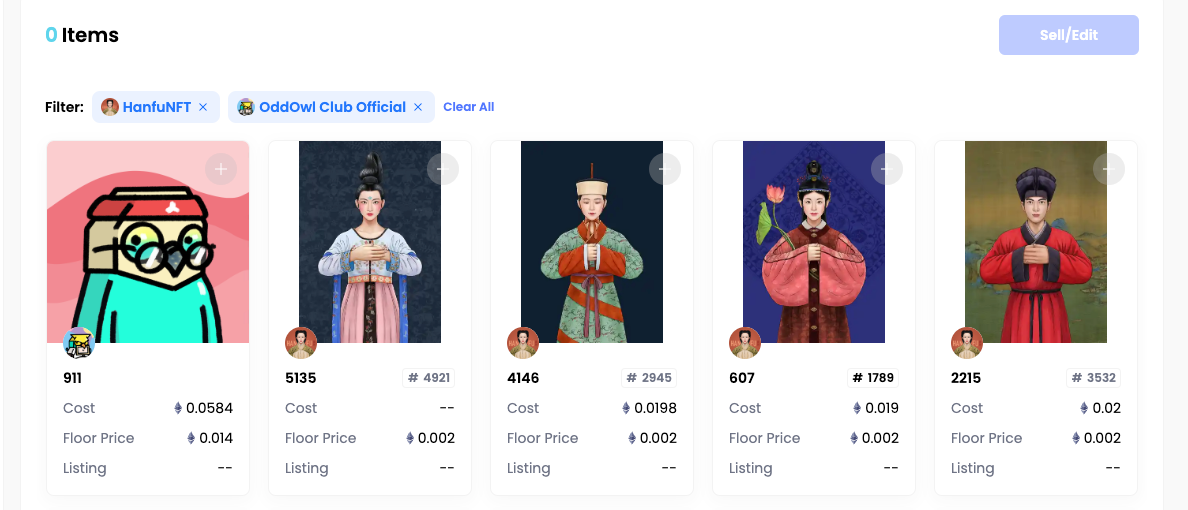
3. User chooses the NFTs that he/she wants to sell
Your client-end should allow the user to toggle on the NFTs for the next step of the operation.
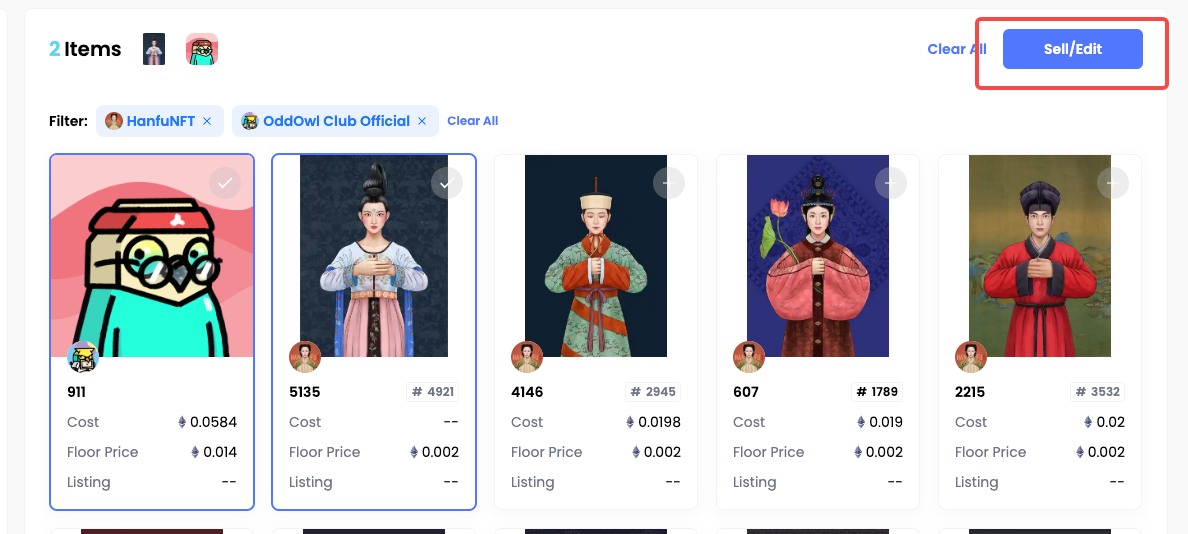
4. Design your own Bulk Listing Edit page for the user
You'll need to design your own bulk listing edit page, allowing users to customize listing parameters. For this feature to be minimally viable on your platform, the edit page could simply allow users to specify the List Price and Duration.
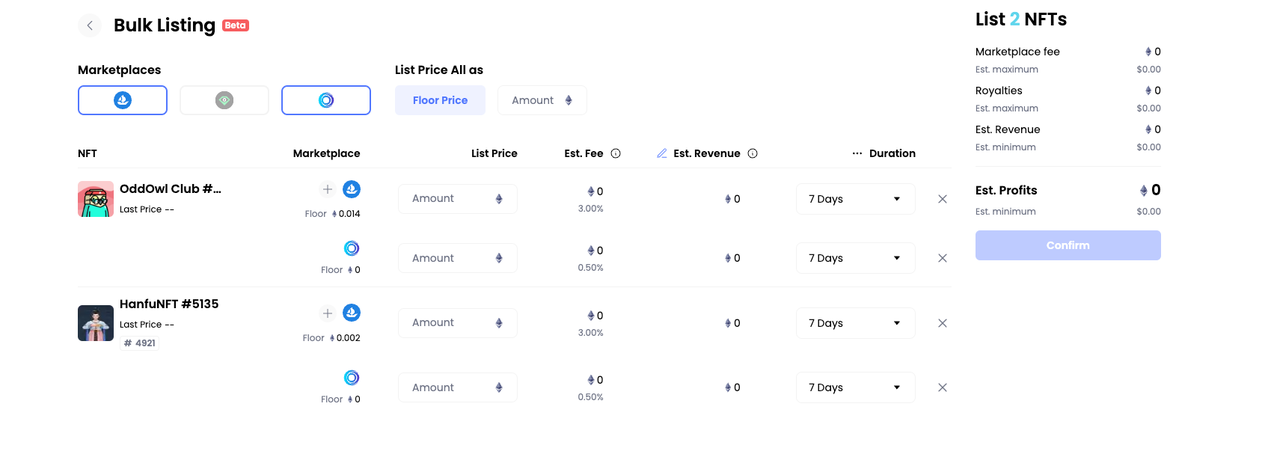
When the user completes the form and clicks the 'Confirm' button, your client-end should trigger the server-end API to obtain the actions for Bulk Listing.
Your corresponding server-end API service code should invoke GoTrading.aggregator.createListings method to get the Bulk Listing actions. This method returns the following actions that require the client-end to execute.
// Server-end code

const baycAddress = '0xBC4CA0EdA7647A8aB7C2061c2E118A18a936f13D';

// Server-end code
// You can define your server-end service layer function parameter
async function bulkListing(params: any) => {
    const { actions } = await goTrading.aggregator.createListings({
        maker: 'User Wallet Address',
        params: [
            {
                "token": "0x4ebb2384cc1e86f578e37f2057b336b9027cb95a:13203",
                "weiPrice": "1000000000000000000",
                "orderKind": "seaport-v1.5",
                "orderbook": "opensea",
                "expirationTime": "1688017272",
                "listingTime": "1689017272"
            }
        ]
    });

    return actions;
}
5. Manage Bulk Listing Steps at Client-End
In terms of the Bulk Listing process, the user typically needs to undertake two actions:
- Approve the marketplaces for NFT access. This is optional if the user has already granted approval;
- Sign the listing orders. This information is encompassed in the data returned in the previous step. Therefore, your client-end needs to parse this data and trigger the Metamask popup to advance with the process.
So, at this stage, your client-end needs to interpret the actions. Here's an example pseudo-code to illustrate this:
Client-end Code
// Client-end code
import { GoTrading, init } from '@nftgo/gotrading';

const goTrading: GoTrading = init({});
// Get the actions from your backend server
const actions = await bulkListing(params)

// Interpret the actions
goTrading.utils.createActionExecutor(actions)
    .execute({
        onTaskExecuted: task => { // You can pass the callback function for each action task executed.
          console.log(task);
        },
    });
In the next step, the user will sign the listings. After that, your client-end needs to transmit these signed listings to your server-end. The server-end will then use the GoTrading SDK to post the signed listings to the designated marketplaces. The default executor withinGoTrading.utils method will take care of the rest for you. With this, you won't need to concern yourself with handling the different API protocols of various marketplaces.
Server-end Code
// Server-end code
import { GoTrading, init } from '@nftgo/gotrading';

const goTrading: GoTrading = init({
    apiKey: 'xxx' // Your NFTGo Developer API Key
    openSeaApiKeyConfig: {
        apiKey: 'xxx', // Your OpenSea API Key
        requestsPerInterval: 10, // 10 requests per interval
        interval: 1000, // interval distance is 1 second
    },
    looksRareApiKeyConfig: {
        apiKey: 'xxx', // Your LooksRare API Key
        requestsPerInterval: 10, // 10 requests per interval
        interval: 1000, // interval distance is 1 second
    },
    x2y2ApiKeyConfig: {
        apiKey: 'xxx', // Your X2Y2 API Key
        requestsPerInterval: 10, // 10 requests per interval
        interval: 1000, // interval distance is 1 second
    }
 });

async function postOrder(postOrderAction) {
    const executor = goTrading.utils.createActionExecutor([postOrderAction]);
    executor.excute();
}
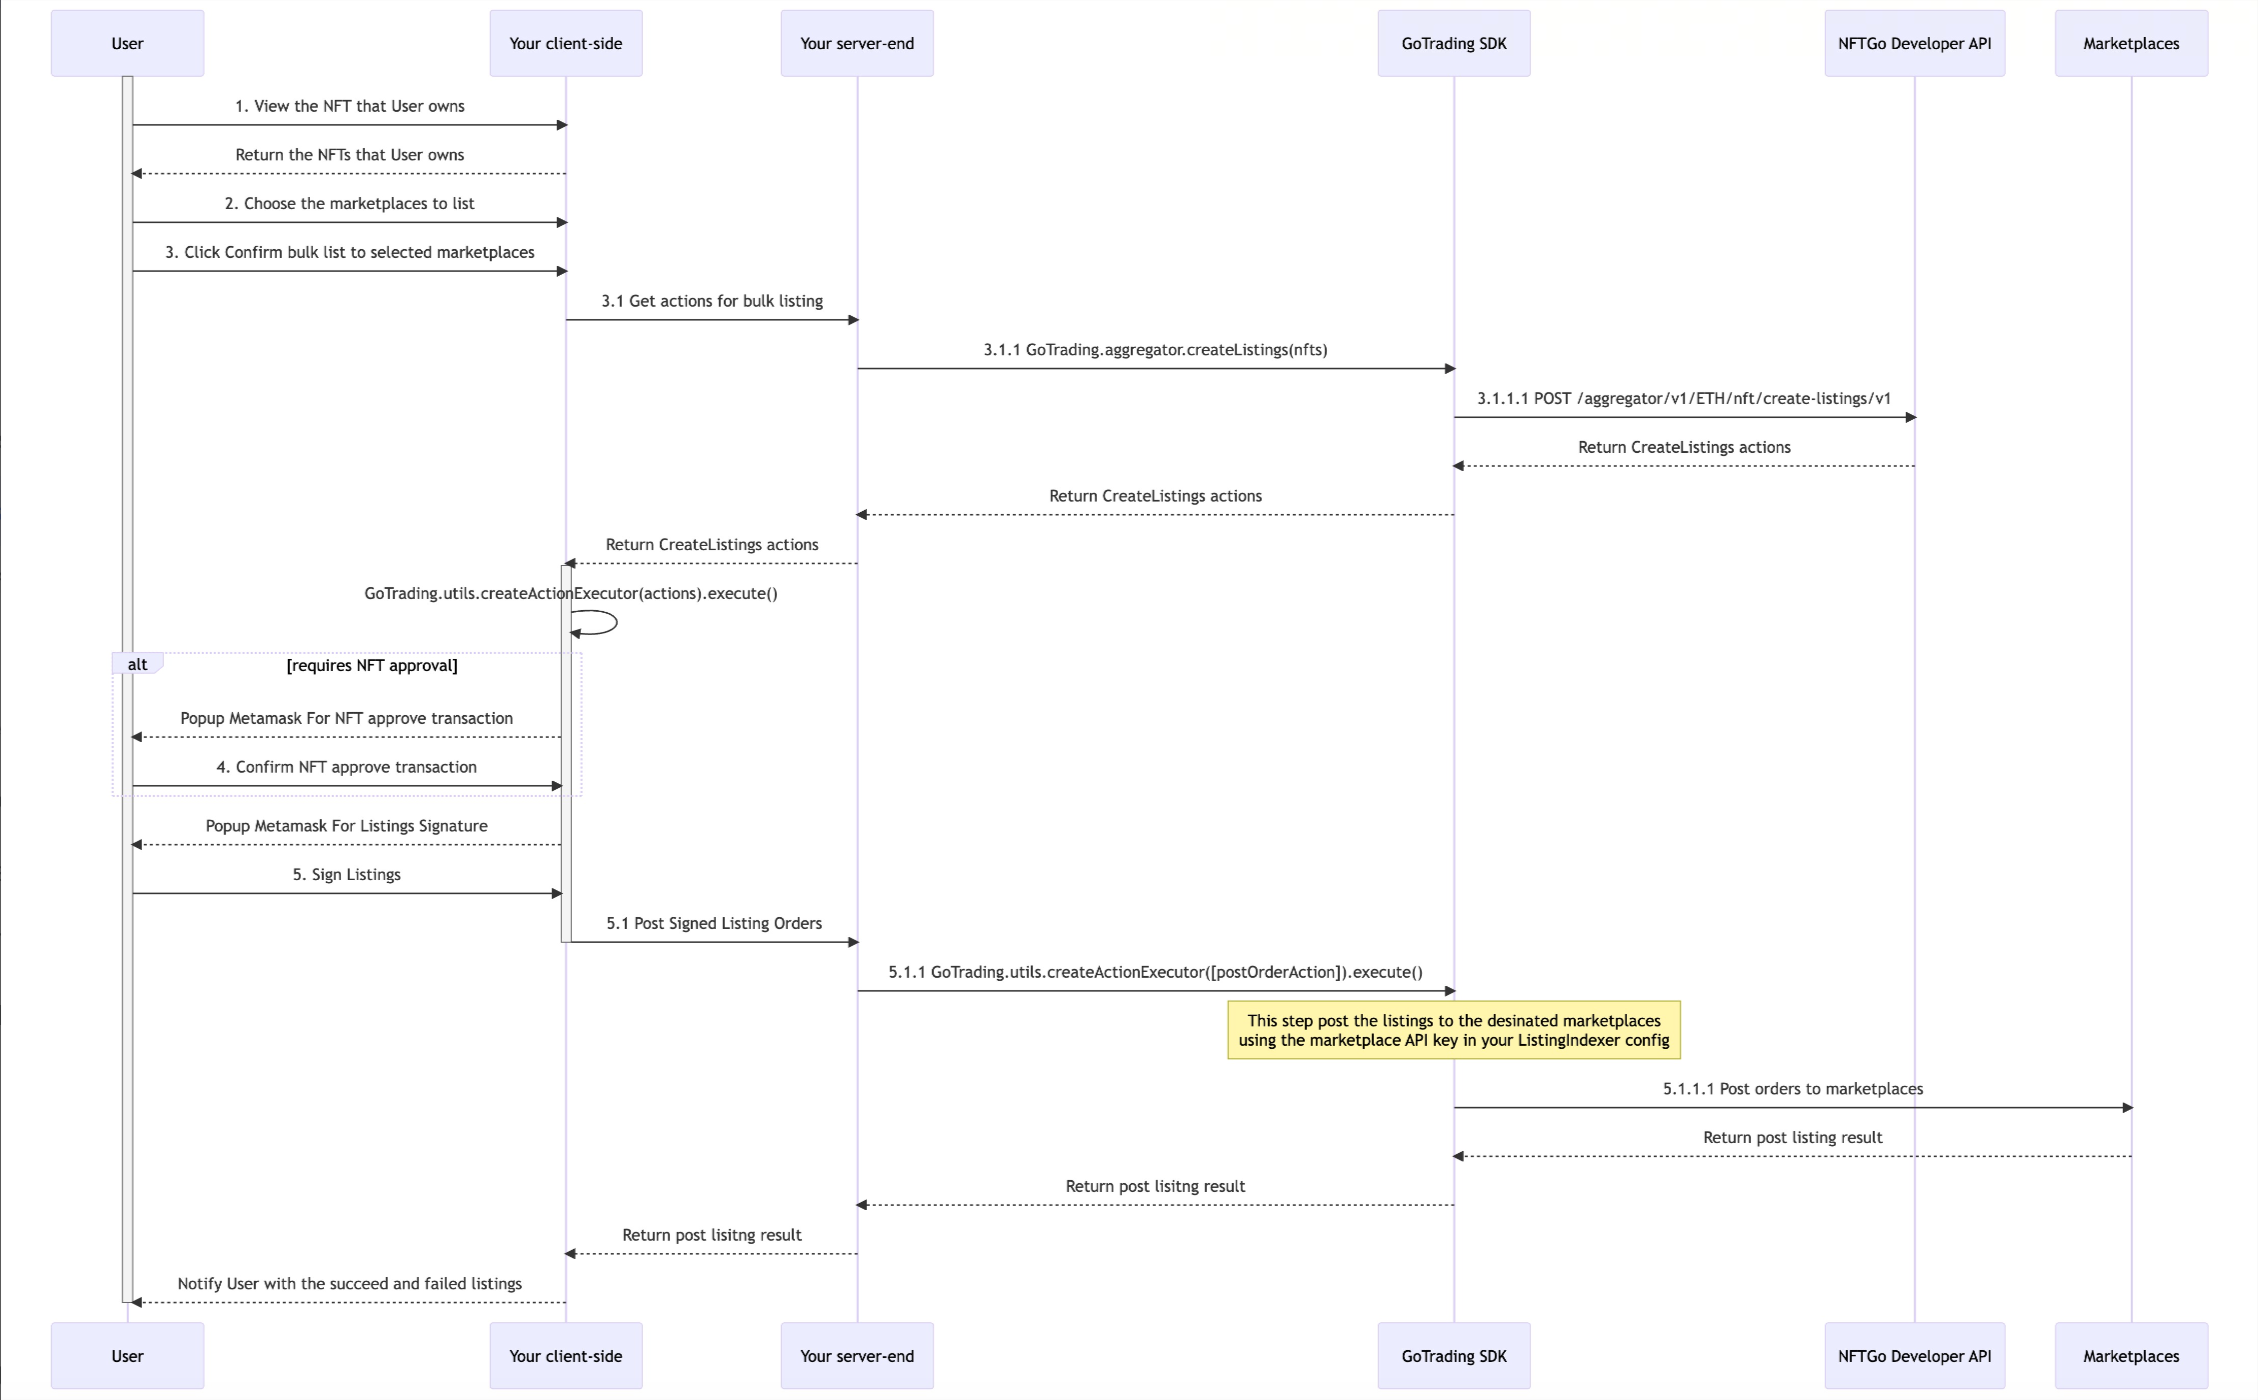
Complete Sequence Diagram
For Auto Trading&Market Makers
List Multiple NFTs
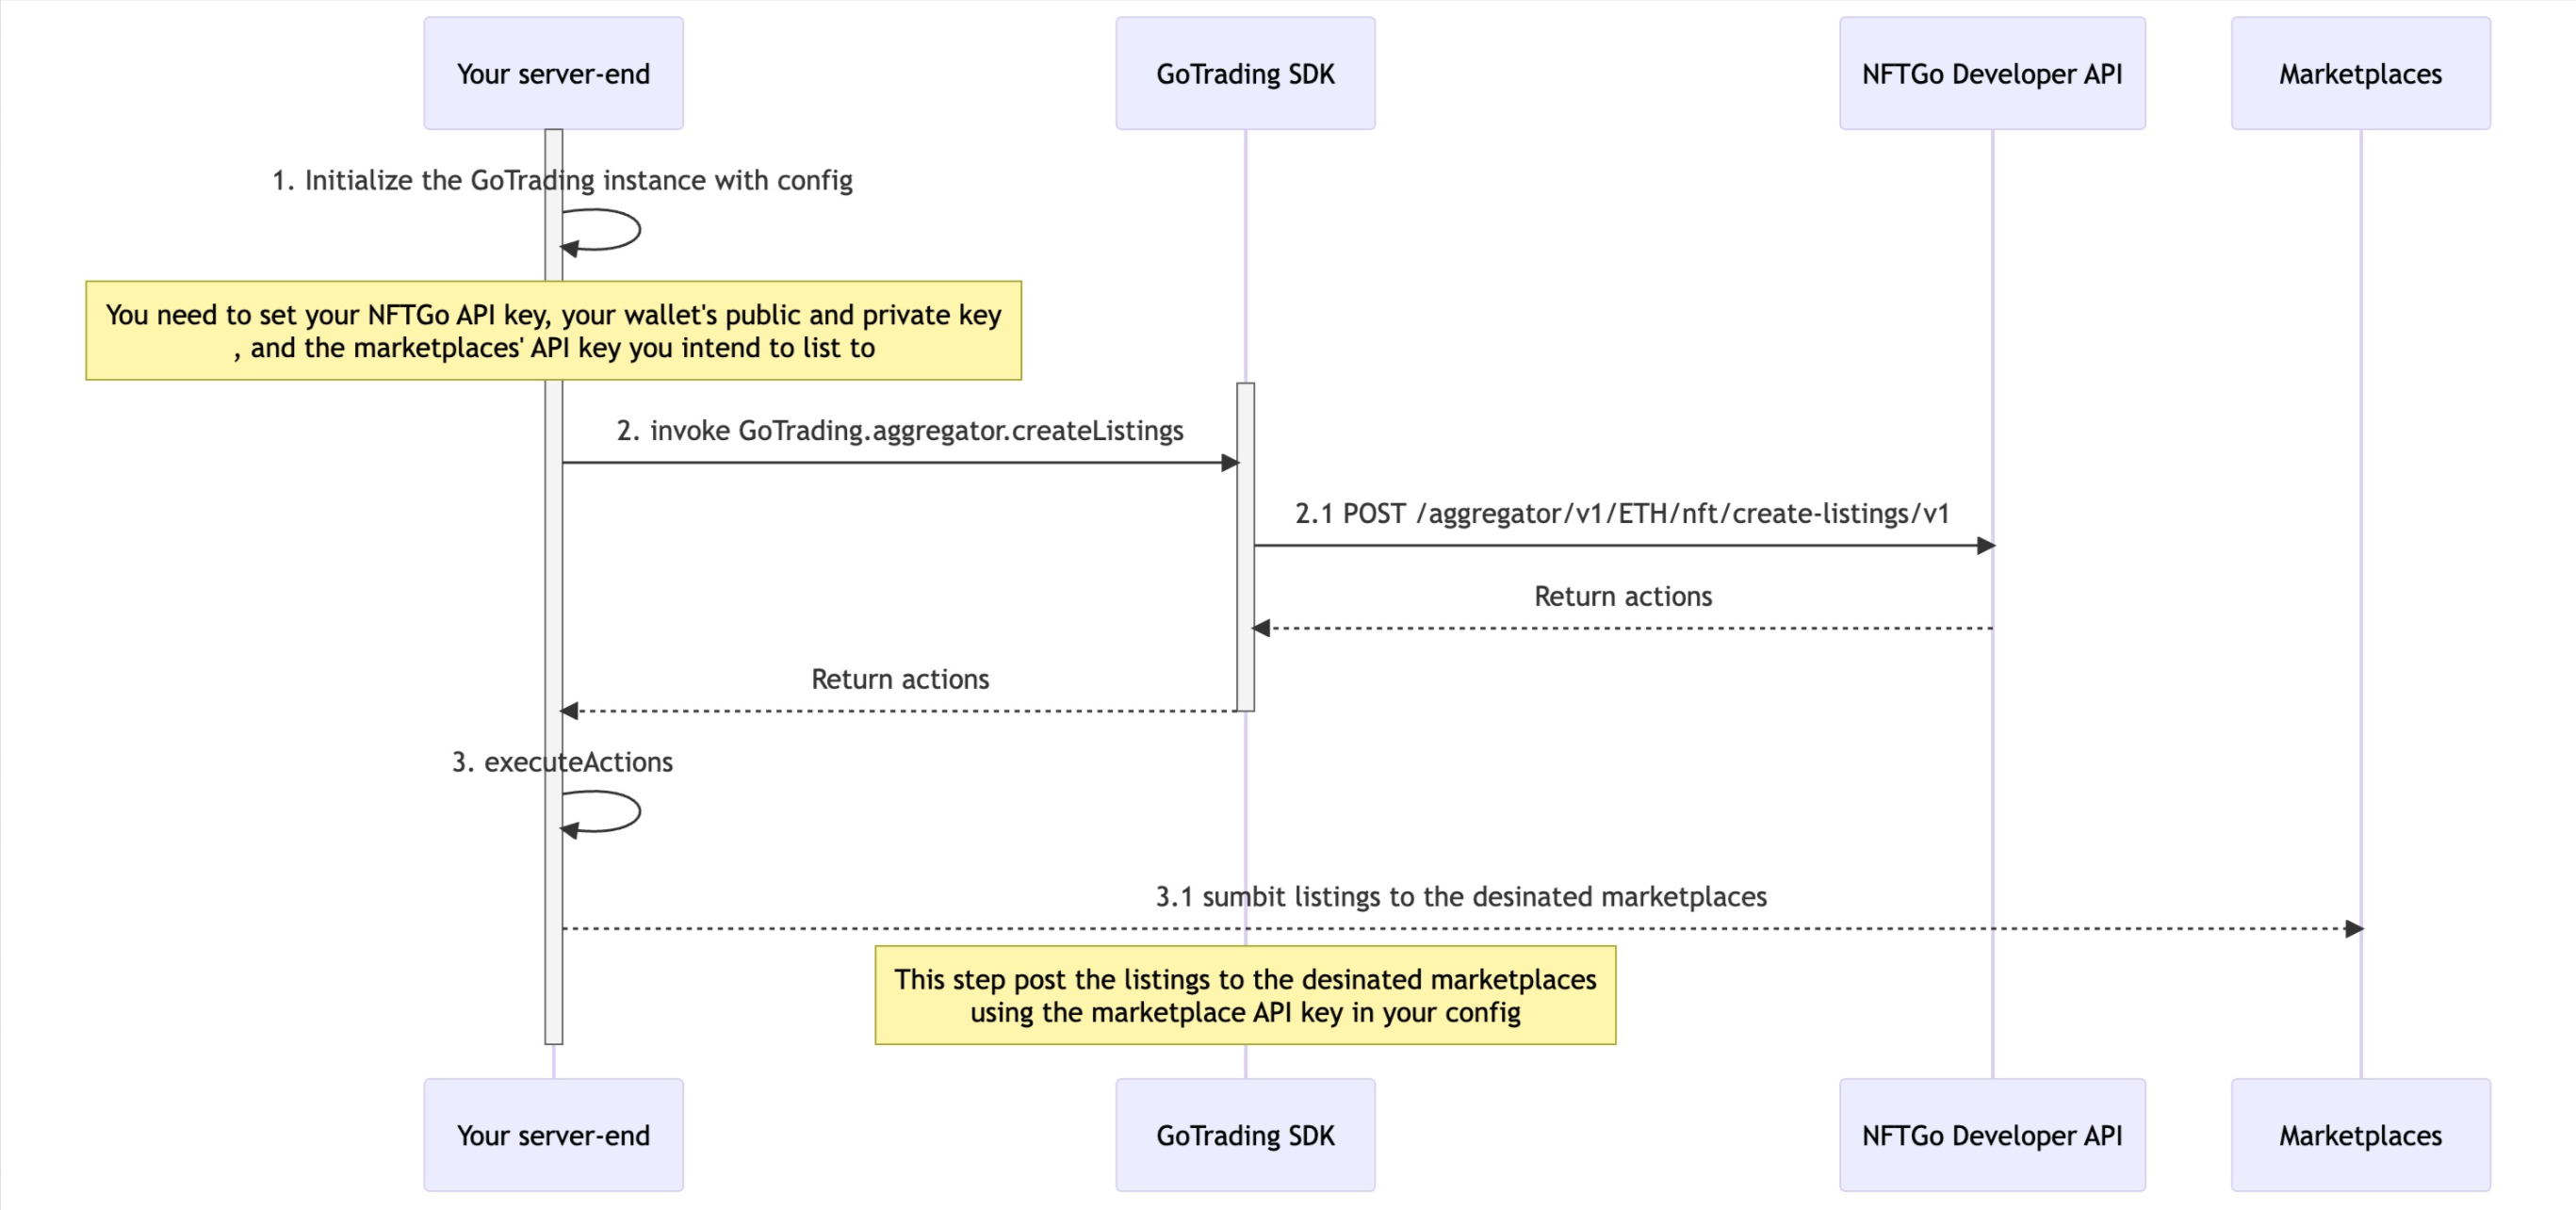
As an NFT Market Maker operating a Node.js server, integrating our GoTrading SDK into your platform is straightforward. The sequence diagram provided below outlines the step-by-step process, illuminating the underlying operations to ensure you have a comprehensive understanding of the integration process. By following this guide, you can seamlessly incorporate GoTrading SDK's functionality into your existing setup, enhancing your capacity for efficient NFT Bulk Listing.
The example code for NFT Bulk Listing is provided below. You can even directly copy and execute this code using the GoTrading.aggregator.createListings method we've implemented to complete your task.
// Init sdk client
import Web3 from 'web3';
import { init, GoTrading, Config } from '@nftgo/gotrading';

// Create a new Web3 Provider to interact with the Ethereum network.
const provider = new Web3.providers.HttpProvider('https://mainnet.infura.io') // Replace with your own provider
const config: Config = {
  apiKey: '', // Replace with your own API Key.
  chain: EVMChain.ETH,
  web3Provider: provider,
  walletConfig: {
    address: process.env.ADDRESS || '',
    privateKey: process.env.PRIVATE_KEY || '',
  },
    openSeaApiKeyConfig: {
        apiKey: 'xxx', // Your OpenSea API Key
        requestsPerInterval: 10, // 10 requests per interval
        interval: 1000, // interval distance is 1 second
    },
    looksRareApiKeyConfig: {
        apiKey: 'xxx', // Your LooksRare API Key
        requestsPerInterval: 10, // 10 requests per interval
        interval: 1000, // interval distance is 1 second
    },
    x2y2ApiKeyConfig: {
        apiKey: 'xxx', // Your X2Y2 API Key
        requestsPerInterval: 10, // 10 requests per interval
        interval: 1000, // interval distance is 1 second
    }
};

// Init GoTrading instance
const goTrading = init(config);

// Get the listing info of BAYC No.1
const baycContract = '0xBC4CA0EdA7647A8aB7C2061c2E118A18a936f13D';
const maker = config.walletConfig?.address || '';

const res = await goTrading.aggregator.createListings({
    maker,
    [
        {
            token: "0x4ebb2384cc1e86f578e37f2057b336b9027cb95a:13203",
            weiPrice: "1000000000000000000",
            orderKind: "seaport-v1.5",
            orderbook: "opensea",
            "expirationTime": "1688017272",
            "listingTime": "1689017272"
        },
        {
            token: "0x4ebb2384cc1e86f578e37f2057b336b9027cb95a:13203",
            weiPrice: "1000000000000000000",
            orderKind: "looks-rare-v2",
            orderbook: "looks-rare",
            "expirationTime": "1688017272",
            "listingTime": "1689017272"
        }
    ]
})

const { executeActions } = res;
await executeActions({
  onTaskExecuted: task => {
    console.info(task);
  },
});
Complete Sequence Diagram
