Fulfill Listings

Gas Estimation

GoTrading provides the most efficient gas-saving solution available. Our transaction routing mechanism directs purchase transactions to different contracts based on the specific composition of the listings' marketplaces. For instance, if a purchase includes only OpenSea's listings, we route it directly to the Seaport contract rather than our Aggregator contract, resulting in lower gas costs.

We simulate every purchase transaction on the mainnet at the latest block before returning it to ensure the transaction's validity(this will make our gas estimation the most accurate), and we achieve the lowest gas cost compared to other viable purchase transaction solutions.

For Dapp Developers

For Dapp developers, the easiest strategy to integrate an NFT Aggregator into your product is outlined below.

Initialize the Aggregator Instance with configuration as you boot up your server end.

// Server-end code  
import { init } from '@nftgo/gotrading';  
import Web3 from 'web3';

// Simply set the provided NFTGo API Key to enable GoTrading SDK  
// to use our Developer APIs.  
const configs = {  
  apiKey: "YOUR-API-KEY", // Replace with your own API Key.  
};

// Create a Trade Aggregator client instance and return the utility and aggregator objects of the Trade Aggregator API.  
const {aggregator, utils} = init(configs);

Bulk Buy by NFTs

1. A user visits an NFT Collection page

When a user visits an NFT Collection page, you are likely to present them with an NFT gallery for all the NFTs under the collection. Along with these NFTs you can display the best listings across various marketplaces.
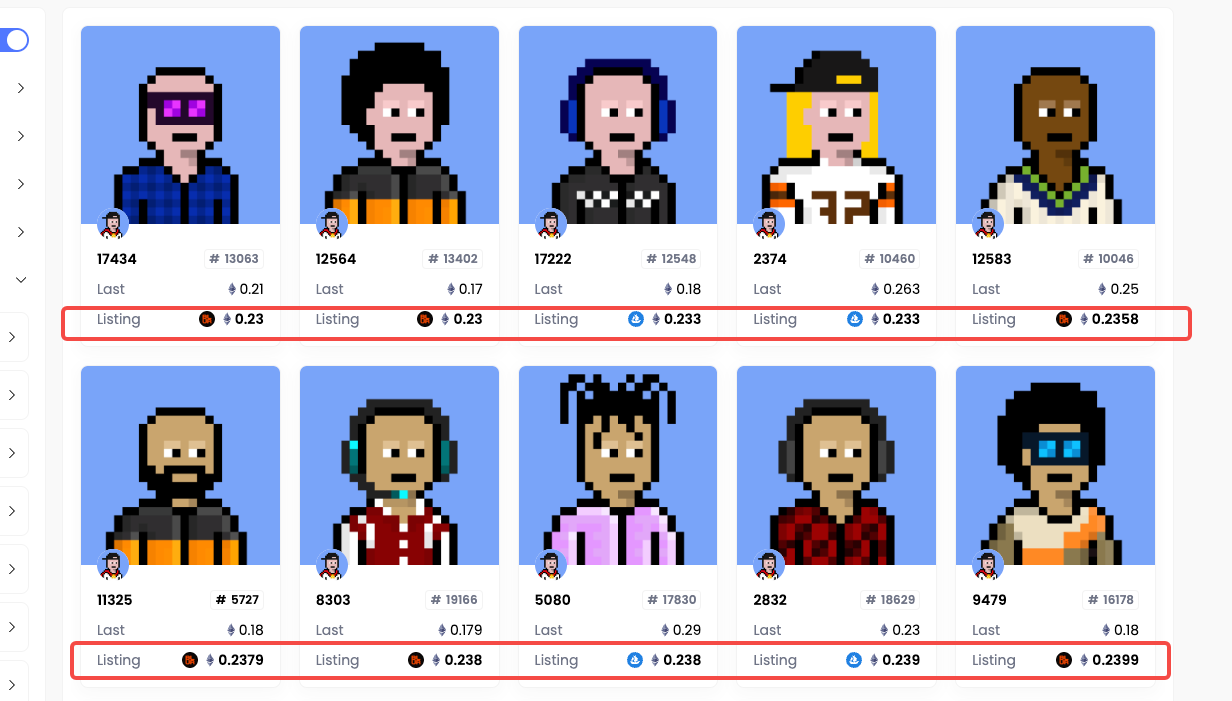
Your client-end application should invoke your server-end application API to retrieve a number of NFTs once the user enters this page. And your server-end can just leverage GoTrading SDK's getListingsOfCollection method to build this feature just like our NFTGo main site.

// Server-end code
import { SortBy } from '@nftgo/gotrading';

// Retrieve the best listings of NFTs under the Collection
// Bored Ape Yacht Club contract address.
const baycContract = "0xBC4CA0EdA7647A8aB7C2061c2E118A18a936f13D";

const { nfts } = await aggregator.getListingsOfCollection(baycContract, {
    SortBy.LISTING_PRICE_LOW_TO_HIGH // Get the NFTs listed in ascending order of price.
});

// Loop through each NFT and log the order ID of its listing.
for (const nft of nfts) {
    console.log(nft.listingData?.listingOrders[0].orderId)
}

Your server-end needs to ensure that the orderId of the listing is returned to the client-end, as this parameter is necessary for the purchase.

2. The user chooses multiple NFTs to purchase

Your client-end should build the Trading Cart feature to temporarily store the user's selected listings. Once the user has made the purchase decision and clicks the Buy Now Button. Your client-end should pass the orderIds of these listings to your server-end application.
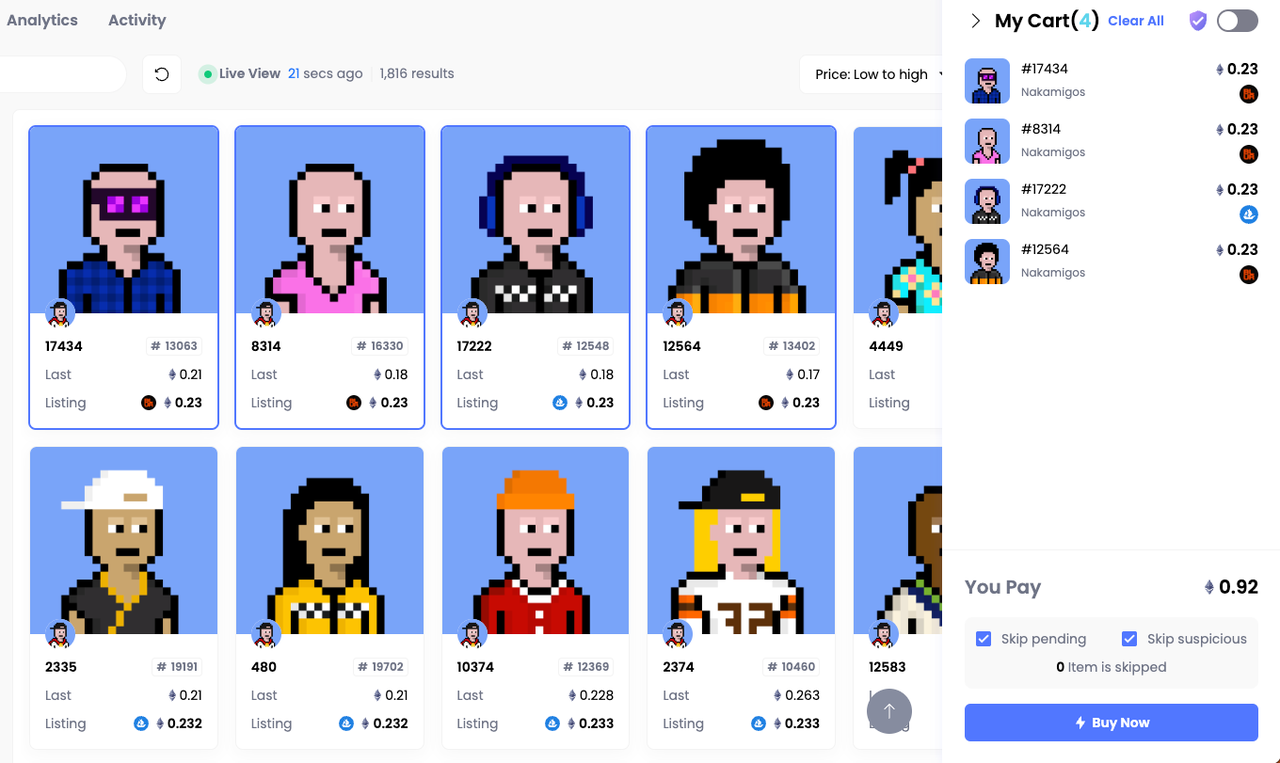
Your server-end application should then invoke the getAggregateInfo method by passing the orderIds.

// Server-end code

import { AggregateParams } from '@nftgo/gotrading';
const orderIds = ["orderIds"]; // Replace with the listings' orderIds

const params: AggregateParams = ({
  buyerAddress: 'buyerAddress', // Replace with the buyer wallet address.
  orderIds: orderIds,
});

const aggregateResponse = await aggregator.getAggregateInfo(params);

console.log(aggregateResponse.txInfo); // Log the transaction data for purchasing the listing.

Next, your server-end application should return the txInfo back to the client-end application, which will then trigger the MetaMask popup for the user. Once the user confirms the transaction, it will be sent to the Ethereum network, completing the purchase.

// Client-end code

web3.eth.sendTransaction({
    data: txInfo.data,
    value: txInfo.value,
    from: txInfo.from,
    to: txInfo.to,
})
.on('transactionHash', function(hash){
  ...
})
.on('receipt', function(receipt){
  ...
})
.on('confirmation', function(confirmationNumber, receipt){ ... })
.on('error', console.error); // If a out of gas error, the second parameter is the receipt.

Buy One NFT

1. A user visits a specific NFT detail page to view the NFT's listings.

When a user visits a specific NFT detail page, you should present them with detailed information about the respective NFT, including any associated listings.

Using BAYC as an example, when a user visits its page, your client-end application should invoke your server-end API to query detailed information about the NFT. This is where you can integrate the GoTrading SDK's Bulk Buying feature. Your server-end application can use the Aggregator Instance that you initiated in the previous step and invoke the getListingsOfNFT method.

// Server-end code

// Retrieve the listing information for BAYC #1
const baycContract = "0xBC4CA0EdA7647A8aB7C2061c2E118A18a936f13D";
const tokenId = "1";
const listingData = await aggregator.getListingsOfNFT(baycContract, tokenId);
listingData.listingOrders.forEach(listingOrder => {
    console.log(listingOrder.orderId); // Log the orderId of listingOrders
})

// Then you can return this listingData with the HTTP response to your client-end

2. The user views the NFT listings and decides to make a purchase.

Users are likely to select the listing with the lowest price, especially if the NFT is listed on multiple marketplaces. Once a user decides to purchase a listing, your client-end application should pass the orderId of that listing to your server-end application. At this point, your server-end application should invoke the getAggregateInfo method.

// Server-end code

import { AggregateParams } from '@nftgo/gotrading';
const orderIds = ["orderIds"]; // Replace with the listing's orderId

const params: AggregateParams = ({
  buyerAddress: 'buyerAddress', // Replace with the buyer wallet address.
  orderIds: orderIds,
});

const aggregateResponse = await aggregator.getAggregateInfo(params);

console.log(aggregateResponse.txInfo); // Log the transaction data for purchasing the listing.

Next, your server-end application should return the txInfo back to the client-end application, which will then trigger the MetaMask popup for the user. Once the user confirms the transaction, it will be sent to the Ethereum network, completing the purchase.

// Client-end code

// https://web3js.readthedocs.io/en/v1.2.11/web3-eth.html#sendtransaction
web3.eth.sendTransaction({
    data: txInfo.data,
    value: txInfo.value,
    from: txInfo.from,
    to: txInfo.to,
})
.on('transactionHash', function(hash){
  ...
})
.on('receipt', function(receipt){
  ...
})
.on('confirmation', function(confirmationNumber, receipt){ ... })
.on('error', console.error); // If a out of gas error, the second parameter is the receipt.

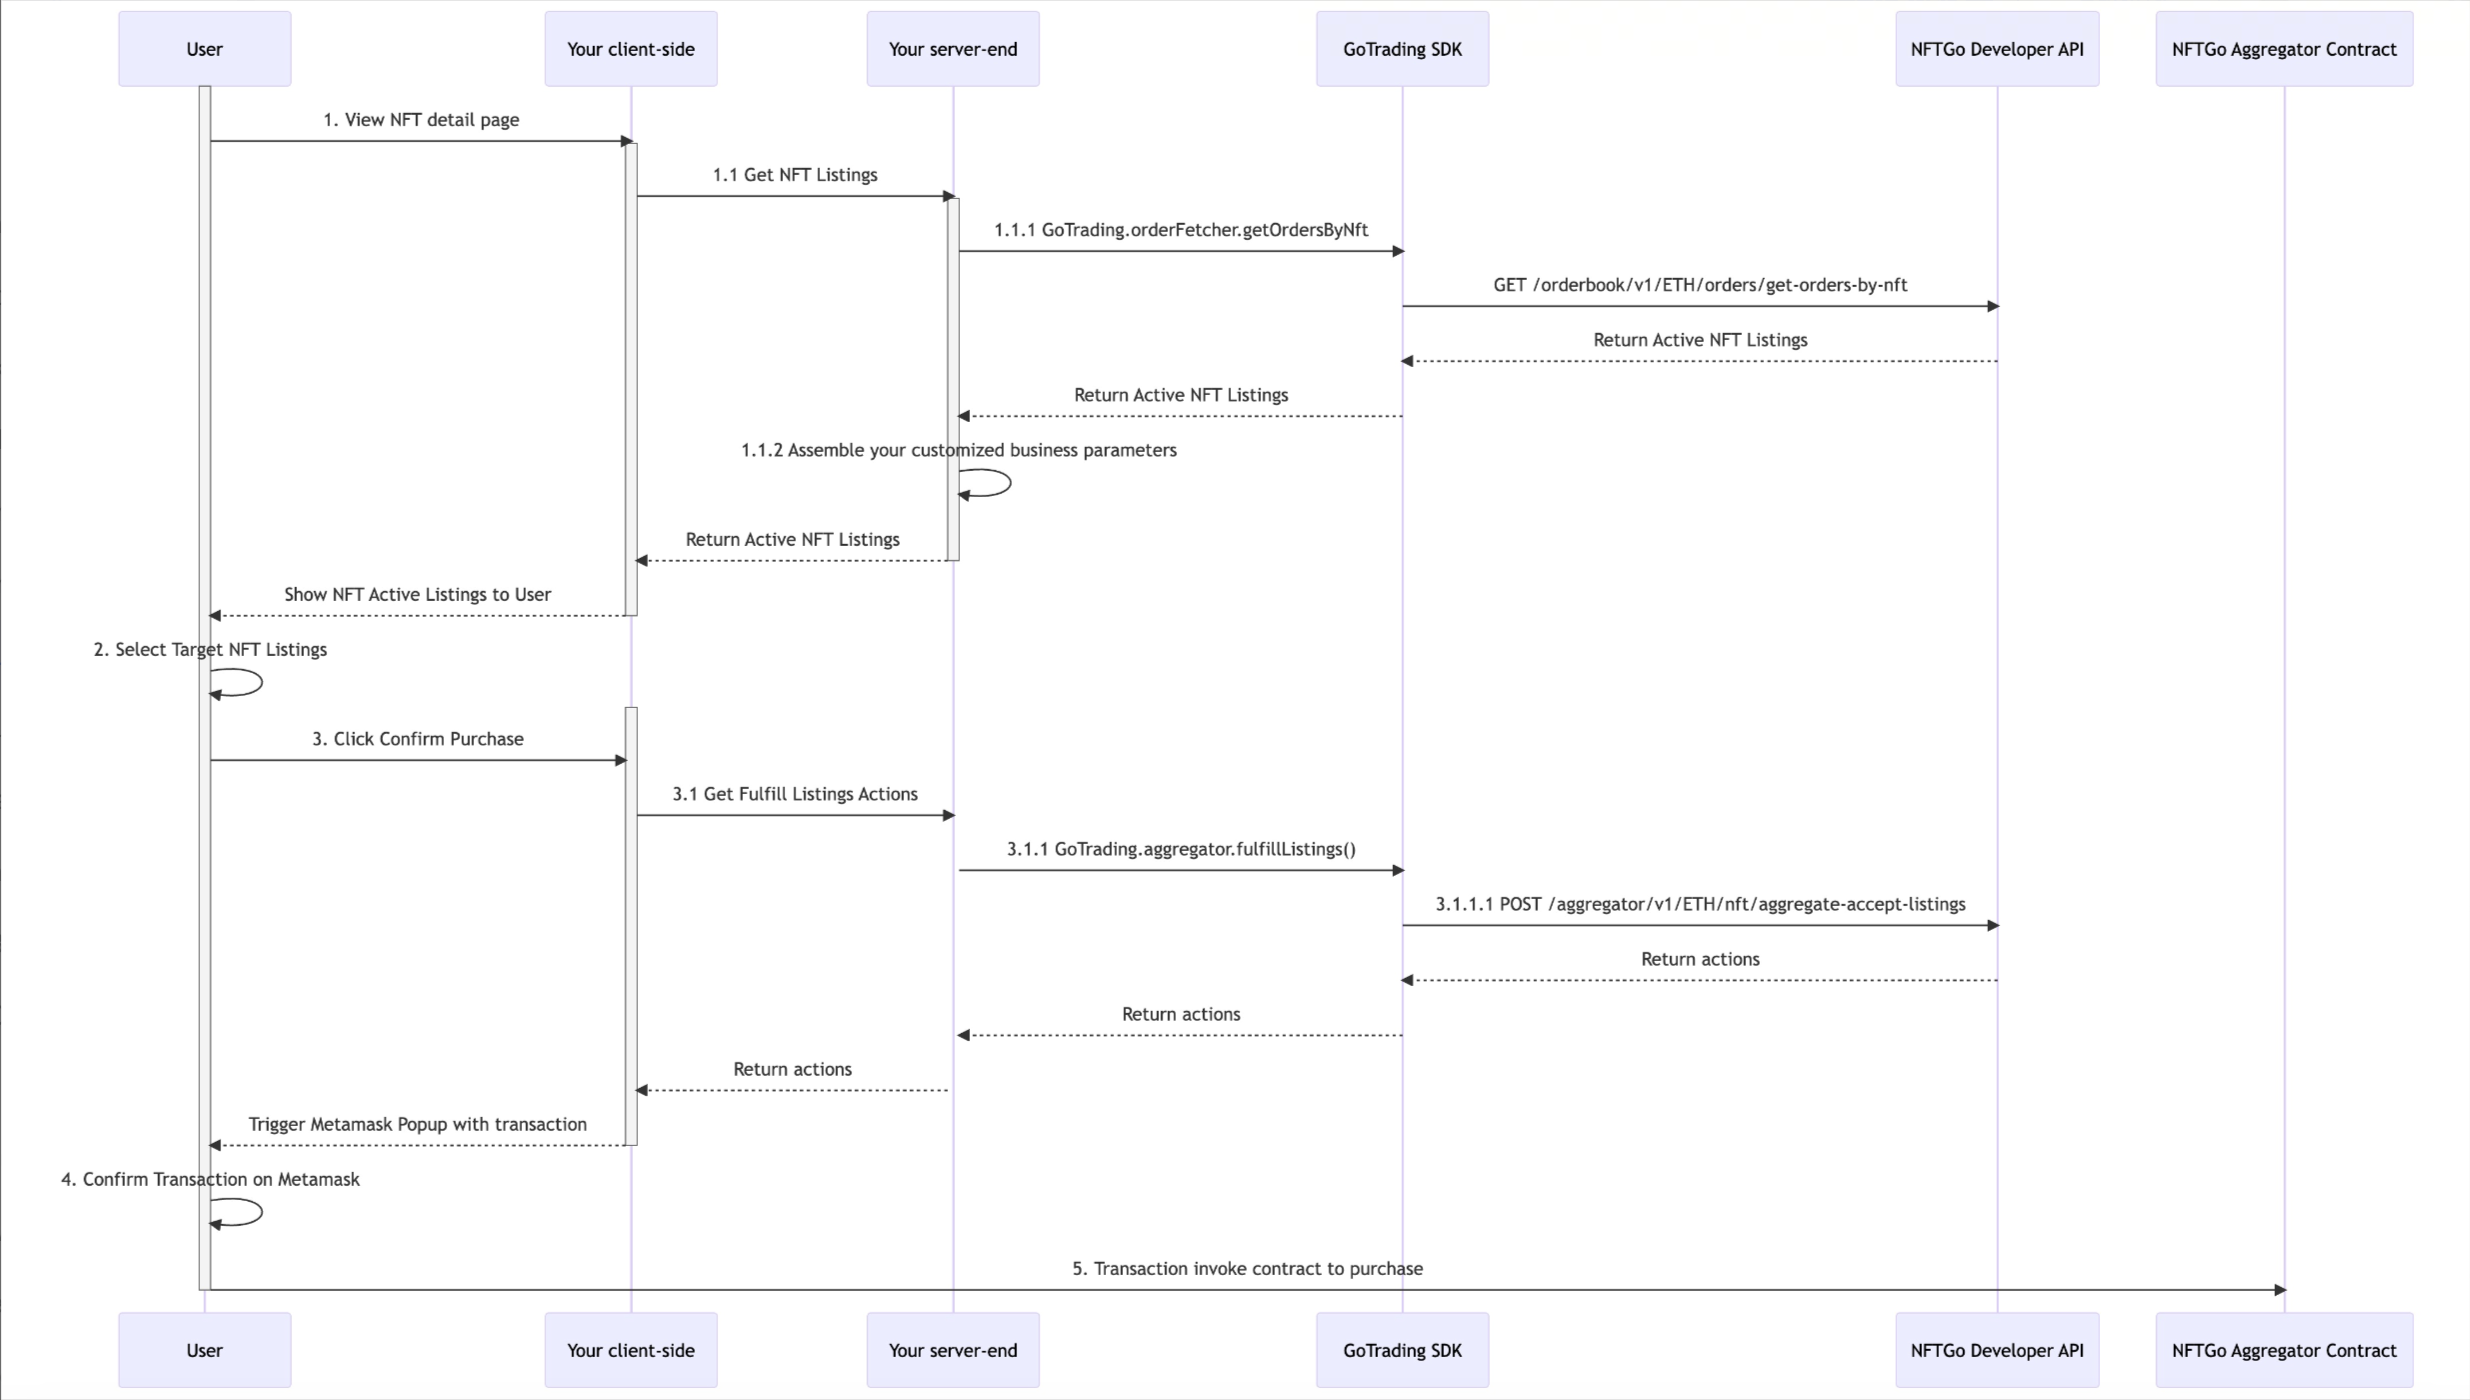
Complete Sequence Diagram

For NFT Market Makers

For NFT Market Makers running server-end applications, who are looking to streamline NFT trading across various marketplaces, the following best practices are recommended.

Please note: All code examples provided below are written for a Node.js environment in Typescript.

Bulk Buy by NFTs

If you're targeting specific NFTs and aim to purchase them as soon as they are listed on any marketplace, consider following the recommended approach below

1. Initiate the Aggregator Instance with the appropriate configuration as you boot up your server-end application.

import { init } from '@nftgo/gotrading';
import Web3 from 'web3';

// Create a new Web3 Provider to interact with the Ethereum network.
const provider = new Web3.providers.HttpProvider('https://mainnet.infura.io') //Replace with your own provider


// To use GoTrading SDK, just set the given NFTGo API Key, 
// a Web3Provider for Ethereum interaction, and a wallet 
// address with its private key for NFT transactions.
const configs = {
  apiKey: "YOUR-API-KEY", // Replace with your own API Key.
  web3Provider: provider,
  walletConfig: {
    address: "Your wallet address",
    privateKey: "Your private key"
  }, // Replace with your wallet info.
};

// Create a Trade Aggregator client instance and return the utility and aggregator objects of the Trade Aggregator API.
const {aggregator, utils} = init(configs);

2. Purchase the targeted NFTs in one go.

You can simply pass the NFT you are targeting and pass it to the bulkBuy method. This method will find the best listings associated with the NFTs and send the transaction to Ethereum network.

const RivermenContract = "0xcfff4c8c0df0e2431977eba7df3d3de857f4b76e"
const nfts: NFTInfoForTrade[] = [ 
// Replace with your own list of NFTs.
    {
        contract: RivermenContract,
        tokenId: "16",
        amount: 1 // How many you want to buy. Usually used in ERC1155 nfts
    },
    {
        contract: RivermenContract,
        tokenId: "18",
        amount: 1
    }
];

// This method encapsulates all the necessary steps to bulk buy nfts if they are listed
aggregator.bulkBuy({
  nfts,
  config: {
      ignoreUnListedNFTs: true,
      ignoreInvalidOrders: false,
      ignoreSuspiciousNFTs: false,
      withSafeMode: false,
  },
  onSendingTransaction: (hash: string) => console.log(hash), // Callback function when a transaction is being sent.
  onFinishTransaction: ( // Callback function when a transaction is finished.
      successNFTs: NFTBaseInfo[],
      failNFTs: NFTBaseInfo[],
      nftsListingInfo: NftsListingInfo
  ) => console.log(successNFTs, failNFTs, nftsListingInfo),
  onError: (error: Error, nftsListingInfo?: NftsListingInfo) =>
      console.log(error, nftsListingInfo), // Callback function when an error occurs during the bulk buy process.
});

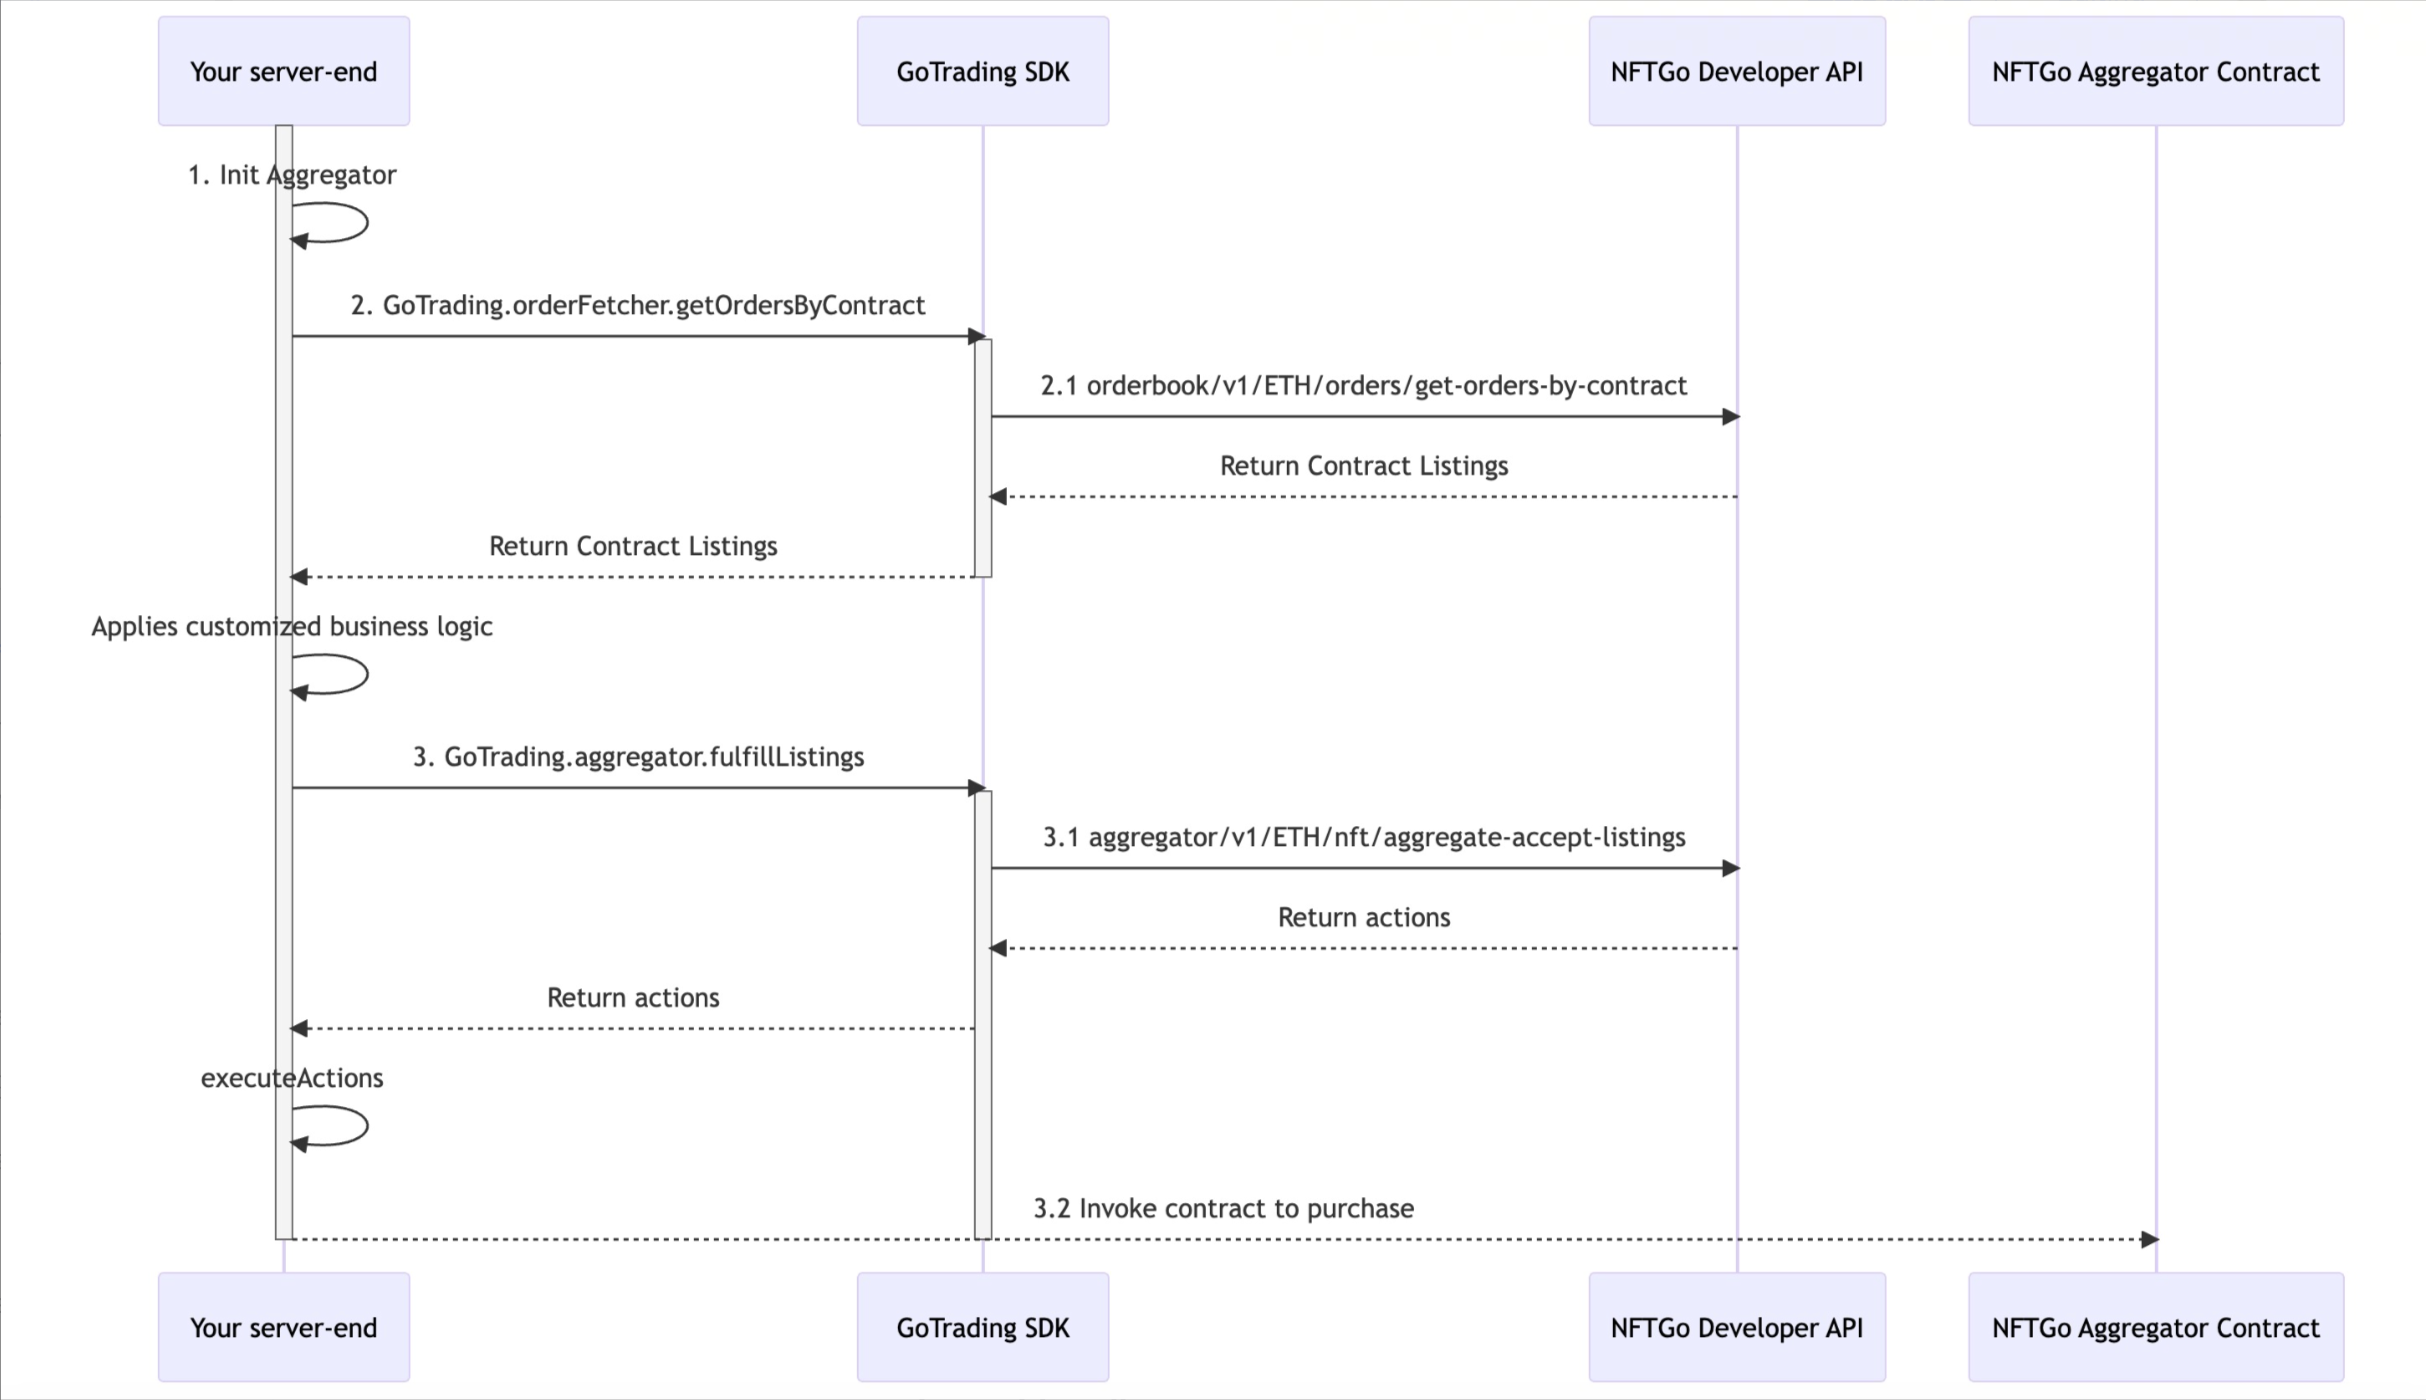
Complete Sequence Diagram

Bulk Buy by Listings

If you seek greater flexibility for purchasing NFTs and wish to customize the business logic flow to your liking, here's an example of how you can leverage our GoTrading SDK to achieve this.

1. Initiate the Aggregator Instance with the appropriate configuration as you boot up your server-end application.

import { init } from '@nftgo/gotrading';
import Web3 from 'web3';

// Create a new Web3 Provider to interact with the Ethereum network.
const provider = new Web3.providers.HttpProvider('https://mainnet.infura.io') //Replace with your own provider

// Configure the necessary parameters for the Trade Aggregator API client.
const configs = {
  apiKey: "YOUR-API-KEY", // Replace with your own API Key.
  web3Provider: provider,
  walletConfig: {
    address: "Your wallet address",
    privateKey: "Your private key"
  }, // Replace with your wallet info.
};

// Create a Trade Aggregator client instance and return the utility and aggregator objects of the Trade Aggregator API.
const {aggregator, utils} = init(configs);

You'll need to set the NFTGo API Key that we've provided. This is essential for the GoTrading SDK to invoke our Developer APIs. Additionally, the Web3Provider is necessary for interaction with the Ethereum Network, along with a wallet's address and its private key to approve the NFT Purchase Transaction.

2. Get the NFT Listings of a BAYC.

Query all the active listings associated with the NFT you are willing to buy.

const baycContract = "0xBC4CA0EdA7647A8aB7C2061c2E118A18a936f13D";
const tokenId = "1";

const listingData = await aggregator.getListingsOfNFT(baycContract, tokenId);

3. Buy the selected listing with your business logic

You need to invoke the getAggregateInfo method to get the purchase transaction, and then send it to Ethereum network using the Utils.sendTransaction method. The Utils object was initiated along with the Aggregator.

// You can replace this with your business logic
const listingToBuy = listingData.listingOrders[0]

const aggregateResponse = await aggregator.getAggregateInfo({
    buyerAddress: 'buyerAddress',
    isSafe: false,
    orderIds: [listingToBuy.orderId],
});

utils.sendTransaction({
    from: aggregateResponse.txInfo.fromAddress,
    to: aggregateResponse.txInfo.toAddress,
    data: aggregateResponse.txInfo.data,
    value: BigNumber.from(aggregateResponse.txInfo.value.toString()).toHexString()
}).on('transactionHash', (hash)=>{
    console.log(hash); // Log the TxHash so you can trace it onchain
});

Complete Sequence Diagram